

That drip… drip… drip you hear from the shower isn't just annoying; it’s the sound of money going straight down the drain. It’s one of those little jobs that’s easy to put off, but trust me, ignoring it can lead to some seriously expensive headaches that a quick fix could have easily prevented. A reliable plumber in Melbourne can solve this quickly, but if you're keen on DIY, this guide is for you.
The Hidden Costs of a Leaky Shower
That persistent dripping is more than a nuisance keeping you up at night. Here in Melbourne, where your home is your biggest asset, a small leak is a huge red flag for both your property and your wallet. It’s tempting to think, "It's just a few drops," but delaying the repair can turn a minor plumbing problem into a financial disaster, especially in suburbs like Balwyn or Kew.
What starts with a simple worn-out washer can quickly get out of hand. The constant moisture is the perfect breeding ground for mould and mildew, which isn't just bad for your family's health—it's expensive to get rid of properly. Worse still, water seeping behind your tiles can silently rot the timber frames, wreck the plasterboard, and weaken the very structure of your bathroom. If you're looking to find a plumber to handle issues like this, it's better to act sooner rather than later.
From Annoyance to Disaster
It's shocking how quickly the cost of ignoring a drip can climb for Melbourne homeowners. Sure, a new shower head might only set you back between $70 and $150, but the real danger is what’s happening behind the scenes.
Industry data shows that over 40% of all residential water damage claims in Australia come from shower failures. Even more worrying, the average repair bill for that damage lands somewhere between $15,000 and $50,000 per incident. That massive gap shows why acting fast is so crucial. A quick call for a simple repair could save a homeowner in Melbourne's eastern suburbs from a catastrophic bill down the track. You can learn more in this complete guide to shower maintenance.
The small cost of a prompt repair is nothing compared to the potential five-figure expense of structural repairs, mould removal, and replacing ruined fixtures. The financial reality of delaying a fix is a powerful motivator for immediate action.
Understanding the Numbers
Let's break down the potential costs for someone in an area like Doncaster or Hawthorn.
- Initial Repair Cost: Fixing a worn washer or O-ring is usually a pretty cheap and straightforward job for any decent Melbourne plumber.
- Water Waste: A shower dripping just 10 times per minute wastes over 1,900 litres of water a year. That really adds up on your utility bills, especially when it’s heated water.
- Structural Damage: Once water gets into your walls, the repair costs skyrocket. You could be looking at replacing timber supports, plaster, insulation, and tiles, which easily runs into thousands.
- Mould Remediation: Getting rid of mould properly requires a professional, and it can be an expensive and disruptive process you’ll want to avoid.
The real problem isn’t the drip itself; it’s the potential for severe, hidden damage that follows. That’s why getting onto it quickly is one of the smartest things you can do as a homeowner. Whether you DIY the fix or call in a pro, acting fast saves money, stress, and your property. For trickier issues like hidden leaks, sometimes advanced solutions like pipe relining in Melbourne are needed to fix the problem without tearing your bathroom apart.
If you’re not sure where the leak is coming from or aren’t comfortable tackling plumbing yourself, it’s always best to get professional help. A small investment now can prevent a massive bill later. Don't let a tiny drip turn into a huge disaster. For a reliable assessment and a fast fix, contact Amari Plumbing and Gasfitting today.
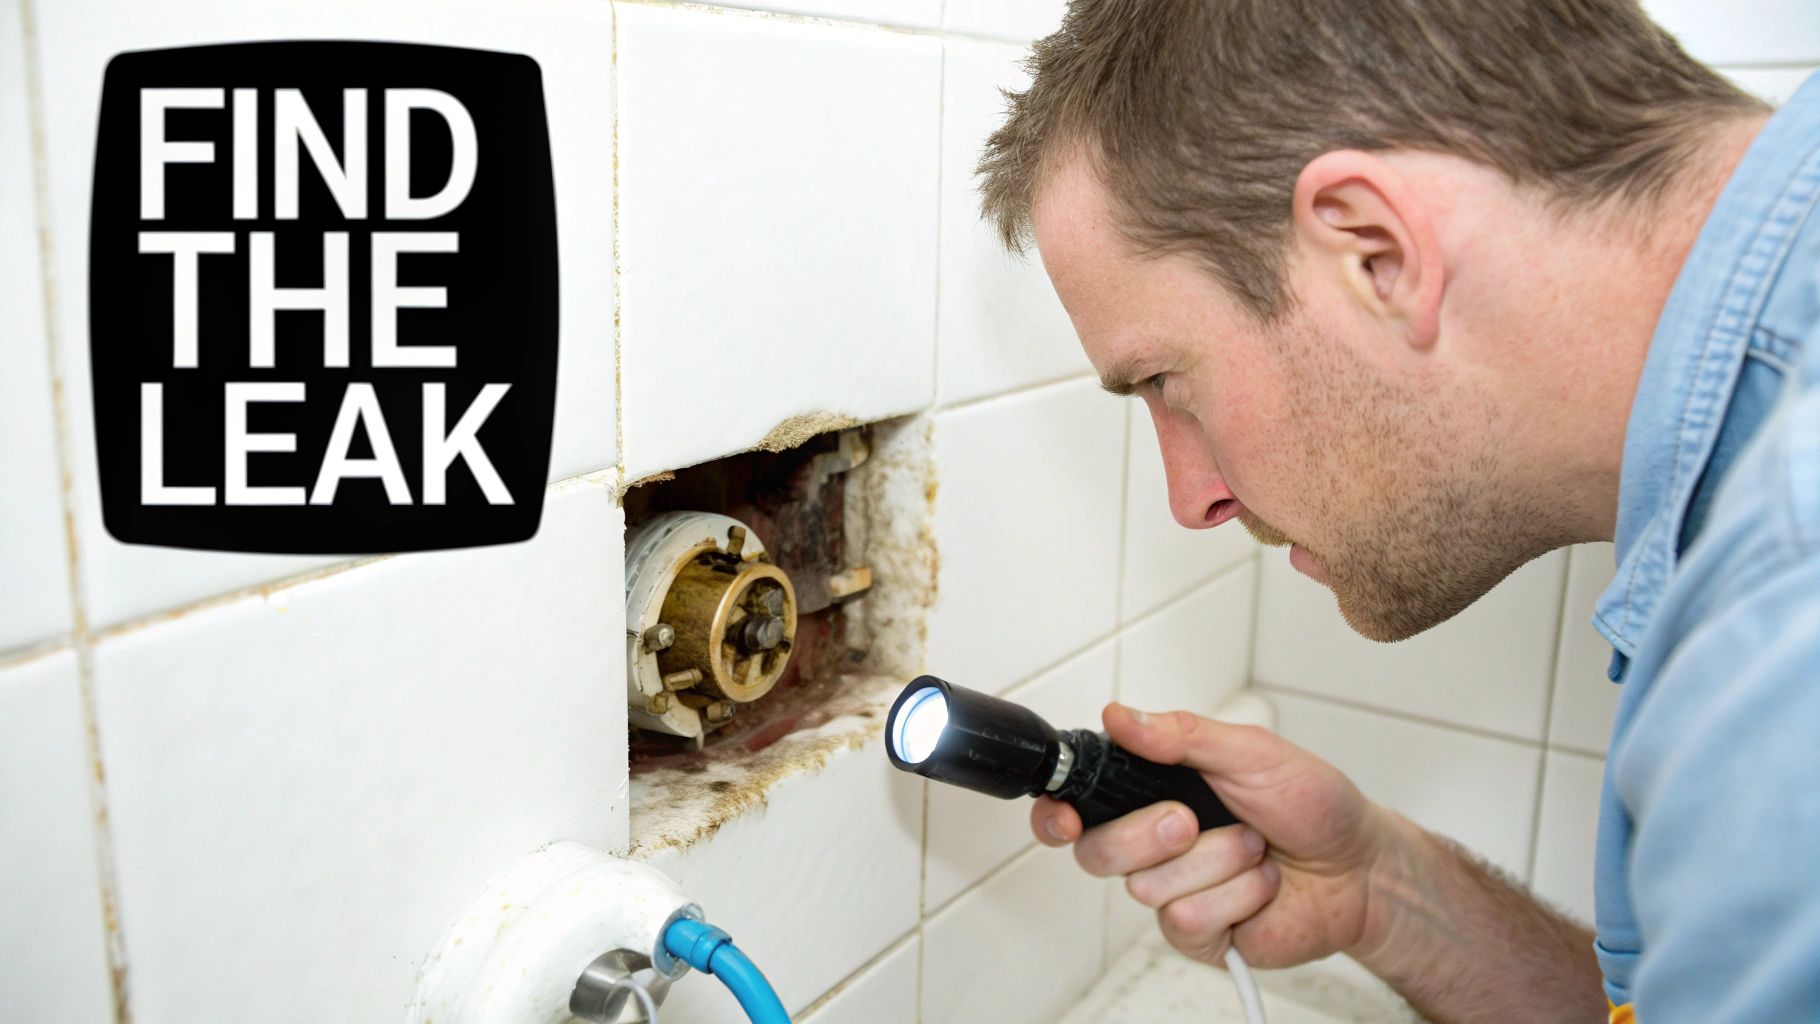
Finding The Source Of The Drip
Alright, let's play detective. Before you can even think about fixing that annoying drip, you need to figure out exactly where it's coming from. It’s easy to blame the shower head itself, but more often than not, the real culprit is a worn-out part hiding inside the tap. This is a common issue seen by Melbourne plumbers, from Balwyn North to Kew.
Getting this first step right is everything. A common mistake I see is people replacing a perfectly good shower head when the problem was a 50-cent washer inside the wall. The location and timing of the drip are your best clues.
Is it a constant drip… drip… drip, or does it only leak when you're using the shower? Is the water coming from the nozzles, or is it seeping out from where the shower arm meets the wall? Nailing down these details will point you straight to the source.
Diagnosing Common Culprits
Let's narrow it down. Most shower drips trace back to just a few usual suspects, and a quick visual check is often all you need to spot them.
- Loose Shower Head Connection: This is the best-case scenario and the easiest fix. If you can see water weeping from where the shower head screws onto the arm pipe, it might just need a good tightening.
- Worn-Out O-Ring or Washer: This is a big one. Inside that connection point is a small rubber O-ring or washer that creates the watertight seal. Over time, they get brittle, crack, and let water sneak past. It’s probably the most frequent cause of a dripping shower head I encounter.
- Failed Valve Cartridge: If the drip is coming from the shower head itself long after you've turned the tap off, a faulty valve cartridge is almost always to blame. This is the mechanism inside the tap that controls the water. Its internal seals wear out, and that’s what causes the leak.
If you suspect the issue might be more serious or hidden behind the wall, our guide on how to detect water leaks has some great tips for tracking down trickier problems around your home. For complex pipe issues, a specialist in sewer relining may even be required.
Sometimes, diagnosing the problem is half the battle. This quick-reference table breaks down common symptoms to help you pinpoint the issue faster.
Common Dripping Shower Head Problems And Solutions
| Symptom | Likely Cause | Recommended Action |
|---|---|---|
| Water drips from the shower head itself, long after the tap is turned off. | Failed Valve Cartridge or Worn Compression Washer. | The internal seals are gone. Replace the cartridge or the washer in the valve body. |
| Water leaks from the base of the shower head, where it meets the shower arm. | Worn O-Ring or Loose Connection. | Try tightening the shower head first. If that fails, replace the O-ring/washer inside. |
| Water drips or sprays from around the tap handle itself. | Faulty Cartridge or Worn Packing. | The seals within the tap body are failing. You'll likely need to replace the entire cartridge. |
| The drip stops and starts randomly, or is very slow. | Limescale Buildup or Debris in the valve. | The valve can't close properly. You'll need to dismantle it, clean the components, and replace any worn seals. |
Remember, this table is a guide. If you open up the tap and things look more complicated, don't hesitate to give a professional plumber near me a call.
Understanding Your Shower Valve Type
Not all taps are built the same. Figuring out which type of valve you have is critical, as it dictates the parts you’ll need and the exact steps for the repair. Most homes in Melbourne will have one of these four.
Compression Valve: Common in older homes, these have two separate handles for hot and cold. They work by using a washer that physically squashes against a valve seat to stop water flow. A constant drip usually means that washer is worn out.
Cartridge Valve: You’ll see these everywhere in modern homes. They usually have a single handle that moves up and down for pressure and side to side for temperature. The whole mechanism is a self-contained cartridge. If it fails, you just pull the old one out and pop a new one in.
Ball Valve: Another single-handle design, this type uses a slotted metal or plastic ball to control the water. Worn rubber seals and little springs are the typical points of failure here.
Ceramic Disc Valve: These are modern and incredibly durable. Two polished ceramic discs glide over each other to create a perfect seal. They last for ages, but if the ceramic cracks or the seals around the discs wear out, you'll get a leak.
Once you know the likely cause and your valve type, you're ready to get the right tools and parts for the job. Taking a few minutes to diagnose properly will save you the frustration of a second trip to the hardware store and put you on the fast track to a quiet, drip-free shower.
Your Essential Toolkit For The Job
Before you even think about unscrewing anything, getting your tools ready is half the battle. Trust me, there’s nothing worse than having to stop mid-job for a frantic trip to Bunnings.
You don’t need a professional plumber’s entire van for this, just a handful of key items. Most of these are probably already sitting in your garage, waiting for their moment to shine.
Essential Tools For The Repair
Getting these bits and pieces together first will make the whole process a lot smoother. Each tool has a job to do, whether it's getting a good grip or making sure you don't scratch up your beautiful tapware.
- Adjustable Wrench: This will be your go-to for most of the loosening and tightening. A medium-sized one is perfect.
- Pliers (Groove-Joint or Channel-Lock): When a wrench just can't get a good grip on an awkward part of the tap handle, these pliers are a lifesaver.
- Phillips Head and Flathead Screwdrivers: Most tap handles hide a single screw under a little cap. You’ll need the right screwdriver to get it out.
- Soft Cloth or Rag: This is non-negotiable. It's a classic plumber’s trick: wrap the jaws of your wrench or pliers with a cloth to stop them from chewing up the chrome finish on your fixtures.
- Utility Knife: Perfect for carefully prying off those little decorative caps that hide the screws, without leaving a mark.
Pro Tip: Chuck an old towel or a thick mat over the shower base before you start. It’s a simple move that’ll save your acrylic or tiles from getting chipped if you drop a tool. It also stops tiny screws from vanishing down the drain for good.
Necessary Materials And Replacement Parts
Once you’ve figured out what’s causing the drip, you'll need the right parts to fix it. The easiest way to get an exact match is to take the old, worn-out part with you to your local hardware or plumbing supply store.
- Replacement Washers and O-Rings: These are the usual suspects. It’s always a good idea to buy a multi-pack with different sizes. They’re cheap and handy to have for future repairs.
- Valve Cartridge (if needed): If you've tracked the leak back to a faulty cartridge, you'll need a very specific replacement. Snap a photo of the old one or, even better, bring it with you to the store.
- Plumber’s Tape (Teflon Tape): This is a must-have for creating a watertight seal on any threaded connection, like where the shower arm screws into the pipe in the wall.
Pre-Repair Safety Steps
Alright, before you touch a single tool, let's talk safety. The first and most critical step is to shut off the water supply to the shower. Look for isolation valves in the bathroom first; if you can't find any, you'll need to turn off the main water supply to the house.
With the water off, open the shower tap to let any leftover water drain out of the pipes. This avoids a surprise gush of water when you start pulling things apart. This is also a great time to check your water pressure, as sometimes excessively high pressure can cause leaks in the first place. Our guide on how to test water pressure at home can walk you through that simple but important check.
Once you've got your tools and your safety checks are done, you’re ready to get stuck in.
Fixing Your Leaking Shower: A Practical Walkthrough
Alright, you've figured out what’s causing the leak and you’ve got your tools lined up. Let's get our hands dirty and put a stop to that drip for good.
This guide will walk you through the actual repair, step-by-step. No confusing jargon here—just real-world techniques to get the job done right. Remember to work methodically. Rushing is a surefire way to break a part or misalign a seal, and you’ll be right back where you started.
First Things First: The Prep Work
Before you start taking anything apart, there are a few non-negotiable prep steps. Getting this right from the beginning makes the whole job safer and smoother.
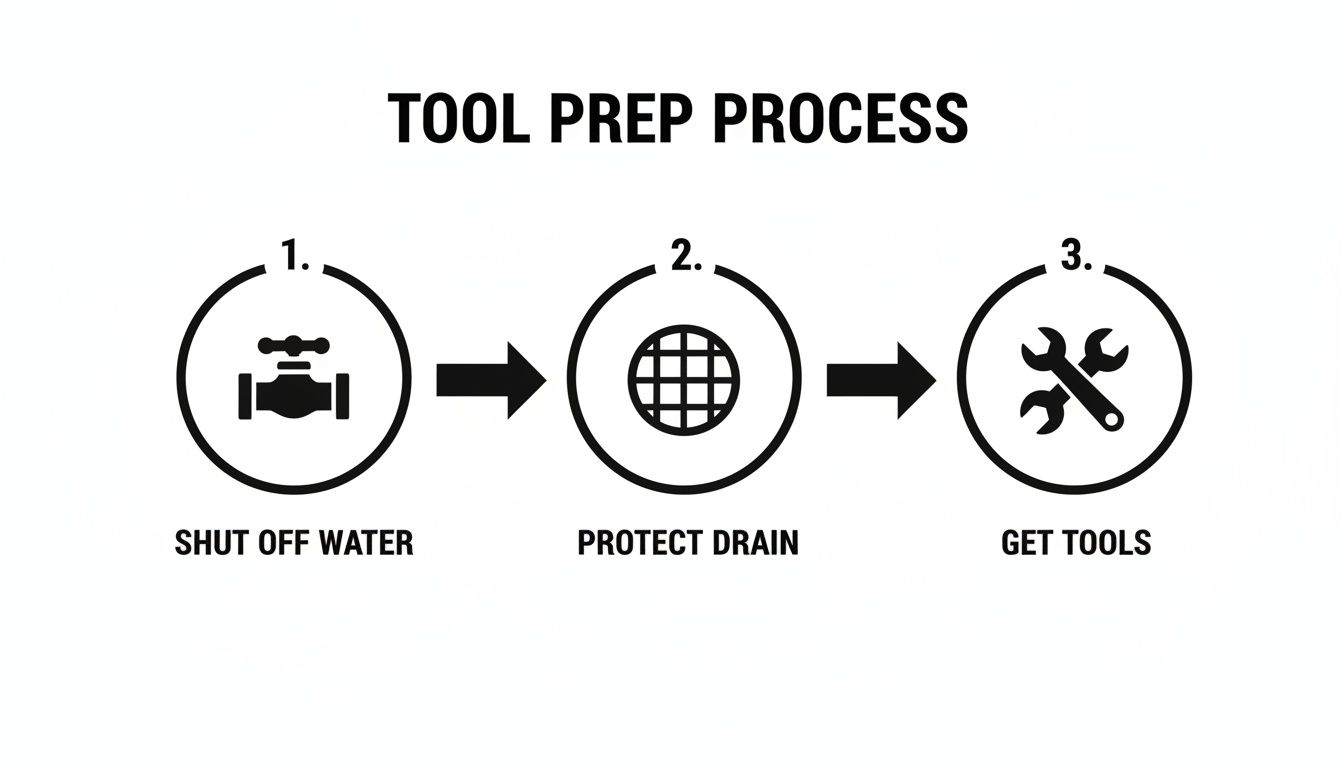
These three actions—shutting off the water, protecting your drain, and getting your tools organised—are essential. They prevent water damage, stop you from losing tiny screws, and avoid frustrating delays.
Dismantling The Shower Tap
With your prep sorted, it's time to carefully dismantle the shower tap to get to the faulty bits inside. Most taps are built pretty similarly: a handle, a faceplate (also called an escutcheon), and the valve hiding underneath.
First, find the little decorative cap on the tap handle. You can usually pop this off with a utility knife or a small flathead screwdriver. This will expose the handle screw.
Once you’ve removed the screw, the handle should pull straight off. It might be a bit stubborn thanks to mineral buildup, so a firm but gentle wiggle usually does the trick. Whatever you do, don't just yank it—you could damage the valve stem.
Handle off? Great. Now you’ll see the faceplate, which is typically held on with two more screws. Unscrew those, and the plate should come away from the wall. This gives you a clear view of the valve body, and you're ready to get to the real work.
Replacing The Worn Components
This is the main event. Depending on what you found during your diagnosis, you'll be swapping out a washer, an O-ring, or the whole valve cartridge.
-
For Compression Taps: If you're working with an older, two-handle tap, you'll see a big bonnet nut that holds the valve stem in place. Use an adjustable wrench to loosen it, then you can pull the stem right out. The worn washer is at the bottom, held by a small brass screw. Swap it for a new one, and you're set.
-
For Cartridge Taps: With the handle and faceplate gone, you'll be looking at the end of the cartridge. Most are secured by a small retaining clip. Pull this out with pliers, and the old cartridge should slide straight out. If it’s stuck, a little twisting motion can help loosen it. Slide the new one in, make sure it’s aligned properly, and pop the clip back in.
-
For Ball or Disc Taps: These can be a touch more complex, often with little springs and seals. It’s a really good idea to lay out the parts in the exact order you remove them. Trust me, it makes reassembly a whole lot easier. Even better, take a quick photo with your phone before you pull it apart—it's a lifesaver.
Pro Tip: While you have the valve open, take the opportunity to give the housing a quick clean. Grab an old cloth and wipe out any sediment or limescale buildup. This helps the new parts create a better seal and will make them last longer.
Reassembly And Testing
Once you've installed the new parts, putting everything back together is just doing the steps in reverse.
Secure the valve stem or cartridge, reattach the faceplate, then slide the handle back on and tighten its screw. Be careful not to overtighten anything; you're aiming for firm and snug, not superhuman-tight.
Before you turn the mains back on, double-check the shower tap is in the 'off' position. Turn the main water valve on slowly—this lets the pipes refill gently and avoids a loud "water hammer" shock. Finally, turn the shower on and off a few times and watch closely for any leaks around the handle or from the shower head itself.
Figuring out if a simple repair is enough or if you need a full replacement can be tough. For Melbourne homeowners, knowing the potential costs can help. Minor fixes like a washer are cheap, but if the valve is corroded or internal parts are failing, installing a whole new shower head might be the smarter, more cost-effective move. You can learn more about leaking shower repair costs and considerations.
If that pesky drip is still there, or you've hit a snag you can't solve, don't stress. It’s just a sign that it’s time to call in a professional. For expert help in areas like Balwyn North or Camberwell, you can always count on an experienced plumber in Melbourne. Don’t let a small drip become a major headache—contact Amari Plumbing and Gasfitting for a fast, reliable solution.
When to Call a Professional Plumber in Melbourne
Knowing your limits is a key part of any successful DIY project. Sometimes, knowing when to put the wrench down is just as important as knowing how to use it. While fixing a dripping shower head can be a satisfying win, there are definite red flags that signal it’s time to call in the pros from services like commercial plumbing or residential experts.
Ignoring these signs can quickly turn a simple repair into a much larger, more expensive headache.
If you’ve followed all the steps, replaced the washer or cartridge, and that stubborn drip still won’t quit, it's a clear sign the issue is deeper than it looks. The problem could be a damaged valve seat inside the wall or even corrosion in the pipes themselves—issues that really need specialised tools and an expert’s touch.
Recognising the Red Flags
Sometimes, the repair job itself creates new problems. If you accidentally strip the threads on a screw or even on the shower arm, you’ve hit a point where a DIY fix is no longer on the cards. Trying to force a stripped component can seriously damage the plumbing inside the wall, leading to major leaks. This is a common scenario we see in suburbs like Doncaster or Hawthorn, where an expert is needed to prevent things from getting worse.
Another critical sign is visible corrosion. If you take the tap apart and see significant rust or chalky mineral buildup on the valve body or connecting pipes, it’s best to stop immediately. Corroded pipes are fragile and can easily break under the pressure of a wrench, potentially causing a burst pipe inside your wall. A skilled roof plumber in Melbourne often deals with corrosion issues and knows when a pipe is beyond a simple fix.
If you're facing a leak that won't quit, have damaged a component, or see any signs of widespread corrosion, your safest and most reliable choice is to call a licensed plumber. Pushing through these complex issues often leads to more damage and higher costs in the long run.
Why a Professional Is the Smartest Choice
A licensed Plumber Melbourne brings more than just a toolbox; they bring years of experience. They can quickly diagnose the real cause of the problem, whether it's a simple fix or a symptom of a bigger issue like excessive water pressure. For instance, what looks like a simple tap issue could actually be related to your hot water system—something a DIYer might not even think to check. For specialised jobs, an expert in gasfitting Melbourne might even be necessary.
Here are a few scenarios where calling a professional is non-negotiable:
- The leak gets worse after your repair attempt. This suggests a deeper problem that needs immediate, expert attention.
- You can't identify the type of valve you have. Using the wrong parts is a surefire way to damage your plumbing.
- The plumbing is old or you suspect pre-existing damage. A professional can properly assess the overall condition and recommend the best course of action.
- The leak is coming from inside the wall. This requires opening up the wall, a job best left to experts who can do it with minimal disruption.
For those plumbing emergencies that happen outside of business hours, understanding your options for after-hours plumbing is crucial to stop a small problem from escalating overnight. A professional ensures the job is done right the first time, preventing future leaks and giving you complete peace of mind.
Got More Questions About Your Dripping Shower?
Even after you've tightened the last screw, you might still have a few things on your mind. It's totally normal. Let's run through some of the most common questions we hear from homeowners around Melbourne about dripping shower heads.
How Long Should It Take to Fix a Simple Dripping Shower?
For a simple job, like swapping out a washer or a worn O-ring, you should be done in under an hour. That gives you enough time to turn off the water, take the tap apart, put the new bit in, and get it all back together.
But, let's be realistic. If you hit a snag like a stubborn, corroded screw or you're just not feeling confident, it's smart to set aside a couple of hours. If you're still scratching your head after two hours, it’s probably time to call a plumber in Melbourne. It'll save you a lot of frustration and probably money in the long run. A local plumber in Balwyn can often provide a quick and efficient service.
Can a Dripping Shower Really Make My Water Bill Spike?
You bet it can. It might seem like just a tiny bit of water, but that constant drip, drip, drip adds up faster than you'd think. A shower head leaking just 10 drips a minute will waste over 1,900 litres of water in a year. Here in Melbourne, that's a direct hit to your water and energy bills (if it's the hot tap). This type of wastage is a common reason people call us for help with blocked drains and other plumbing inefficiencies.
Fixing the leak is great, but you can do even better. Water conservation is a big deal across Australia, and a leaky shower is the perfect excuse to upgrade. Switching to a modern WELS 5-star water-saving showerhead can save a two-person household in Melbourne around $160 on bills every year. These new models use up to 60% less water, so it’s an investment that quickly pays for itself. You can dig into more of these stats over at this insightful article.
That little drip isn't just annoying; it's a major source of water waste. Fixing it is a great chance to make a long-term, money-saving upgrade to your bathroom.
I Replaced the Washer, but My Shower Is Still Dripping. Now What?
Ah, the classic. You've done the obvious fix, but the drip is still there. Nine times out of ten, the next thing to check is the valve seat. This is the little brass ring that the washer pushes against to stop the water. If it’s worn down, corroded, or has a tiny crack, you won't get a proper seal.
You could try smoothing it out with a tool called a valve seat dresser, but it could also be a problem with an O-ring or even a cracked valve cartridge. Honestly, if the washer replacement didn't do the trick, it’s a good sign it’s time to call emergency plumbers Melbourne. Fiddling around without the right tools and know-how can easily turn a small problem into a much bigger one. A professional plumber in Kew or a plumber in Camberwell will have the specific tools for this.
Is It Better to Repair My Old Shower Tap or Just Replace the Whole Thing?
This really comes down to the age of your tap and what's actually wrong with it. If it's a fairly new tap and just needs a simple part like a washer, then a repair makes the most sense. It's cheap and easy.
On the other hand, if your tap is getting on a bit, looks corroded, or needs several expensive parts, you’re often better off replacing the entire unit. A new shower mixer or tap set doesn't just stop the drip for good; it also boosts your water efficiency and gives your bathroom a fresh new look. A professional plumber from Hawthorn or a plumber from Bulleen can give your old tap a quick once-over and tell you honestly whether it's worth repairing or if it's time for an upgrade.
If your DIY attempt didn't go as planned or you're looking at a bigger plumbing headache, don't stress. The expert team at Amari Plumbing and Gasfitting is always ready to sort out any issues for homeowners across Melbourne's eastern suburbs, with fast, reliable, and affordable service. For a free quote and some peace of mind, contact us today.